How to Configure SD-WAN Security Zones with SteelConnect EX
- By Riverbed Technology
- 10-Jun-2020
Enterprises are leveraging both Intranet and Internet to bring remote offices, mobile workers, and business partners into their trusted network environments. Once an attacker gains access into this trusted internal network, it opens the door to serious threats. Enterprise security is becoming a critical component of enterprise security solutions around the globe. Segmenting the network helps to control data traffic in an enterprise and limits the access to attackers by preventing lateral movement between these networks. This segmentation of data traffic is termed as Zone.
Zone in a branch can be defined as:
- A logical group of network access points provided to end users.
- A network for corporate applications.
- Guest Wi-Fi hotspots, etc.
In this blog, we are going to cover Zone Protection Profiles, which help to protect your network from attacks including common flood, reconnaissance attacks, and other packet-based attacks. Zone Protection Profiles provide a secure mechanism against certain types of traffic to enter a zone.
SteelConnect EX Zone Protection
Interfaces are networking communication points. In a given network, interfaces can share the same or different security configurations for traffic flow. In SteelConnect EX, you can group all the interfaces with the same security configurations into a security zone.
Each security zone can be associated with a security profile, i.e., Zone Protection Profile. So, whenever a Zone Protection Profile is defined for a security zone, it will automatically be mapped with all the interfaces in that security zone. Interfaces can be associated with a single security zone.
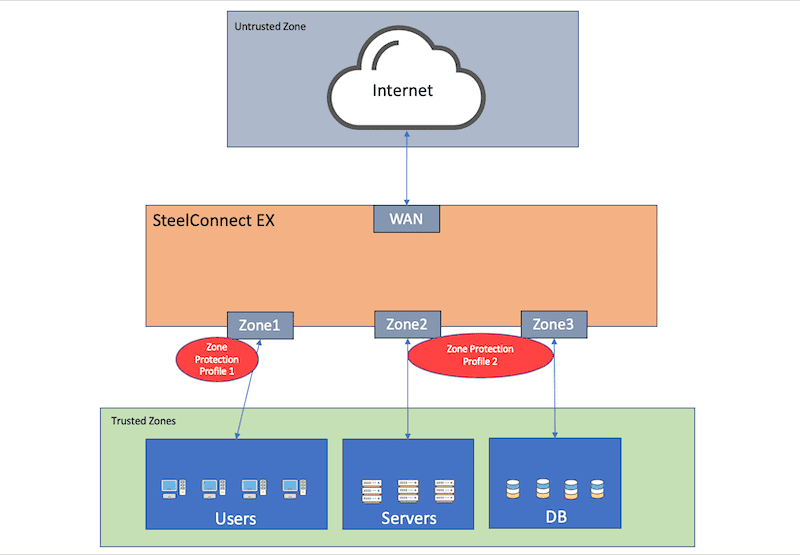
Zone Protection Profile allows stateful inspection of TCP UDP & ICMP data traffic flows. Based on the Zone Protection Profile, traffic can either be passed or dropped between the zones.
SteelConnect EX Zone Protection Configuration
For Zone Protection configurations:
- Define a zone before assigning interfaces to a zone.
- An interface can be assigned to only one security zone.
- By default, traffic can flow among interfaces that belong to the same security zone.
- For traffic between zones, a policy must be configured.
Please follow the steps below to configure SteelConnect EX Zone Protection:
Step 1: Create Zone Protection Profile
Zone Protection Profile provides a mechanism to detect and prevent malicious traffic from entering the network. To protect a zone, define a Zone Protection Profile and associate it with a security zone. To configure Zone Protection Profile, follow the below steps:
- Select Administration > Appliance and select the appliance to navigate to the appliance context.
- Select Configuration > Networking > Zones Protection Profiles from the left panel.
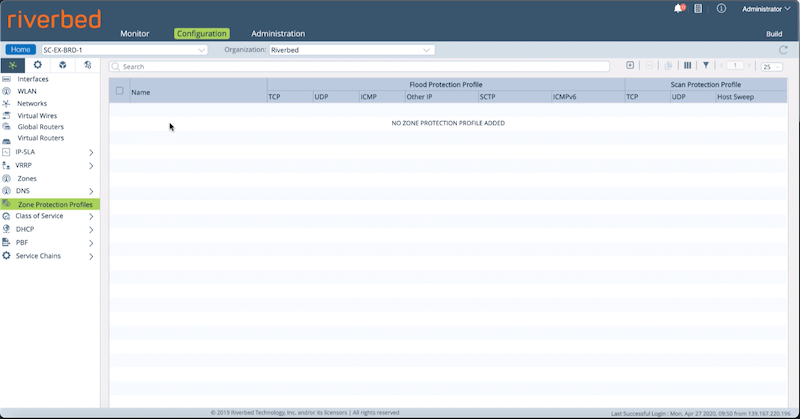
- Click ‘+’ to add Zone Protection Profile.
All the tabs have been explained in detail below:
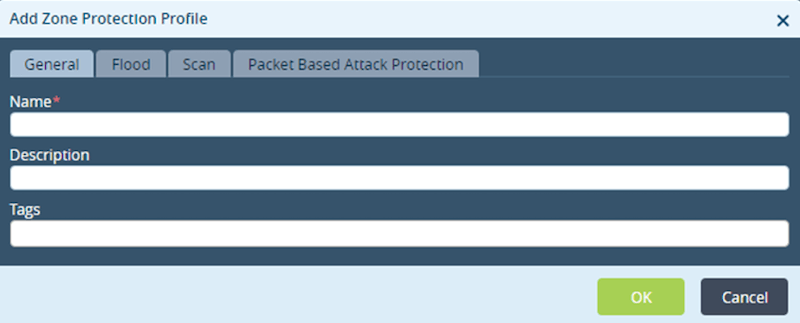
The General tab has all these mentioned fields:
- Name: Name of the Zone Protection Profile.
- Description: Brief description of the interface and its purpose.
- Tag: A keyword to filter the Zone Protection Profile.
You can use the Flood tab to configure flood thresholds for this protection profile.
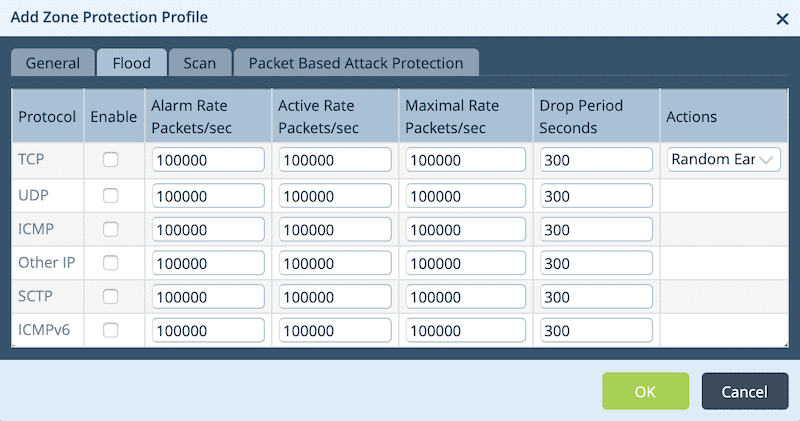
- Protocol: The supported protocols have been shown in the above snapshot. One can enable flood monitoring for this protection profile by clicking on the checkbox against the protocol.
- Alarm Rate Packets/sec: An alarm will get generated when the number of packets received per second matches the value defined in the field.
- Active Rate Packets/sec: Packets will get randomly dropped when the number of packets received per second matches the value defined in the field.
- Maximum Rate Packets/sec: All the packets will get dropped when the number of packets received per second matches the value defined in the field.
- Drop Period Seconds: Duration of the packet dropping.
- Actions: Action for data packet spoofing. Options are:
- Random early drop
- Cookies
You can use the Scan tab to configure scan protection for this protection profile.

- Scan: Different types of scans have been shown in the above screenshot. One can enable a scan for this protection profile by clicking on the checkbox against the scan profile.
- Actions: Action when an abnormal scan is detected. Options are:
- Allow – Allows to run the scan.
- Alert – Generates an alert.
- Interval: The time interval at which the scan occurs.
- Threshold: The threshold value, after which an alarm will get generated.
You can use the Packet Based Attack Protection tab to protect the network from invalid packets.
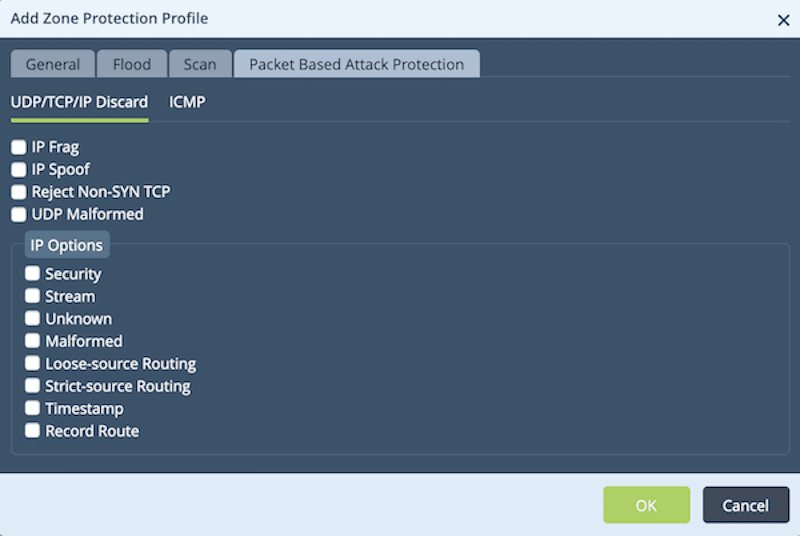
- UDP/TCP/IP/Discard:
- IP Frag – Drop Packets with a fragmented IP address.
- IP Spoof – Drop spoofed packets.
- Reject Non-SYN TCP – Drop packets if the first packet in a session has a Non-SYN flag.
- UDP Malformed – Drop packets in case of a checksum error.
- One can select from Different IP options for this protection profile.
- ICMP:
- Ping Zero ID – Drop packets with zero ID.
- Fragment – Drop fragmented packets.
- Large Packet (length > 1024 bytes) – Drop packets if the size is greater than 1024 bytes.
- Error Message – Drop packets if error messages are generated on a ping request.
- Malformed Packet – Drop malformed packets.
- Click OK to create and configure Zone Protection Profile.
Step 2: Define Security Zone
A security zone can be configured on a per-tenant basis. Security Zones in a given tenant can be identified by a unique name. The same name can be used in different tenants.
To configure the Security Zone, follow the below steps:
- Select Administration > Appliance and select the appliance to navigate to the appliance context.
- Select Configuration > Networking > Zones from the left panel.
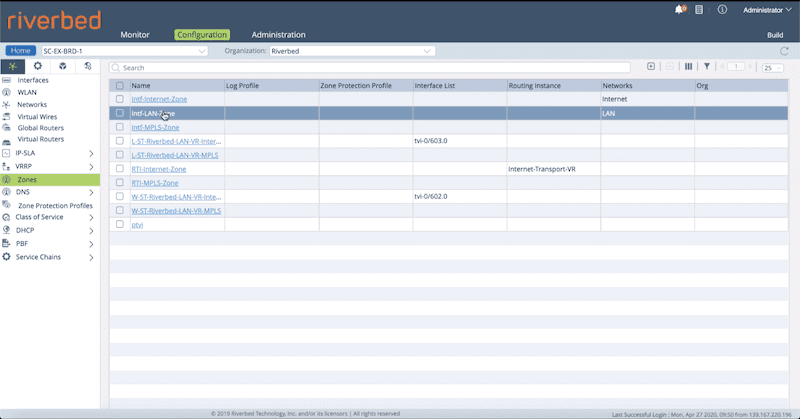
- Click ‘+’ to add Security Zone.
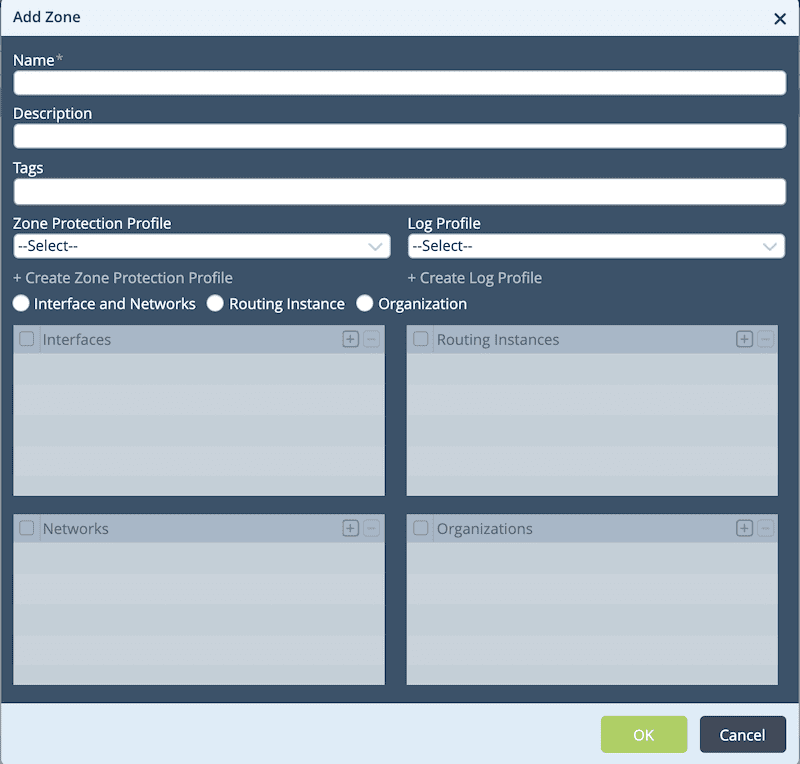
- Name: Name of a security zone.
- Description: Brief description of interfaces.
- Tags: A keyword to filter the Security Zone.
- Zone Protection Profile: Profile to protect the zone. Please refer to the previous step for more details.
- Log Profile: Log Profile to be used with this Zone.
- Interfaces & Networks: Select this to add interfaces and networks with this security zone.
- For interface, click and select an interface from the list.
- For networks, click and select a network from the list.
- Routing Instance: Select this to add a routing instance with the security zone.
- Organization: Select an organization with the security zone.
- Click OK to create and configure a new zone for an appliance.
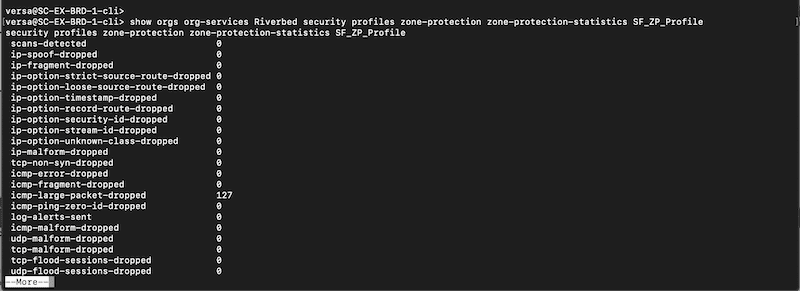
Verification
Alarms or events will be generated when there is a policy match in the Zone Protection Profile. Trigger the command below to verify stats via SteelConnect EX CLI.
versa@SC-EX-BRD-1-cli> show orgs org-services <org-name> security profiles zone-protection zone-protection-statistics <zone-protection-profile-name>
Summary
In this article, we went through a common security use case for SD-WAN branches. We secured a network zone by using the Zone Protection Profile. You can create one or more Zone Protection Profiles and associate any of them with a security zone. Traffic will be dropped based on configurations in the Zone Protection Profile. With the use of templates, these security policies can be deployed at scale and with consistency on the whole SD-WAN network.